
Best Web Hosting Provider In India 2024
DNS (Domain Name System) sounds like a scary abbreviation for something that’s actually very simple to understand. Simple put, it’s a system that converts site addresses from machine-friendly numbers, into human-friendly names. If not for DNS, website names would look something like 93.184.16.12 instead of https://www.gadgets360.com.
To convert these numbers into addresses, your browser relies on a DNS Server, and although this will be set up by default, you can also change the DNS Server that you’re using. There are a number of reasons for doing this, and the process itself is very simple.
Why would I want to change my DNS server?
Your Internet service provider (ISP) issues a DNS server to you by default. ISP provided DNS servers aren’t always the best as they may lead to speed and reliability issues, such as some websites not opening or taking too long to load.
These DNS servers may not be equipped with security features that you’d get if you used a DNS server such as Google DNS. There can be other uses for this, such as accessing blocked websites. If you want to use Google DNS you can change the DNS server to 8.8.8.8 and alternate server to 8.8.4.4 – OpenDNS uses 208.67.222.222 and 208.67.220.220, or you can use any other DNS server you prefer.
If you are having issues with your Internet connection, changing the DNS server could be a fix. Here’s how to change the DNS server.
Windows
Follow these steps to change DNS servers on Windows. These steps will work on Windows 7, 8, or 10.
How to change DNS on Windows 7, Windows 8, or Windows 10:
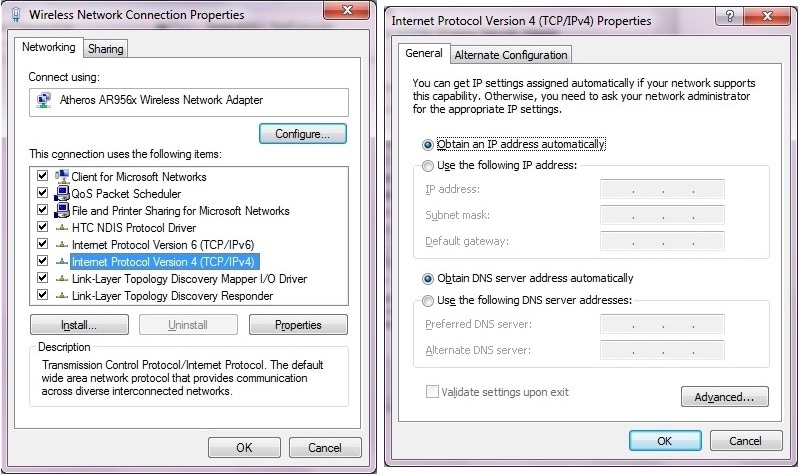
- Open Control Panel and select Network and Sharing Centre. Alternatively you can right-click the network status icon on the system tray (bottom-right of the screen, near volume controls).
- Click Change adapter settings on the left pane.
- Right-click the Internet connection you want to change DNS servers for and select Properties.
- Select Internet Protocol Version 4 (TCP / IPv4) and click Properties.
- Click the button next to Use the following DNS server addresses: and enter the DNS server addresses of your choice. Click OK when you’re done.
![]()
macOS
Here’s how to change DNS servers on a Mac:
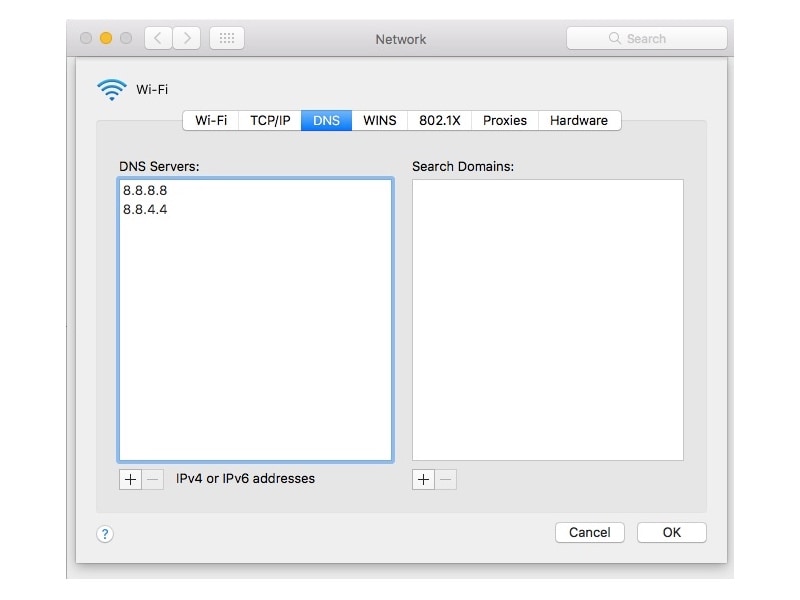
- Go to System Preferences -> Network.
- Select the Internet connection you’re connected to, and click Advanced.
- Select the tab marked DNS.
- Click the DNS servers in the box on the left and click the – button.
- Now click the + button and add DNS servers of your choice.
- Click Okay when you’re done to save the changes.
![]()
That’s how you change DNS servers on Windows machine or Mac. For more tutorials, visit our How To section.
Best Web Hosting Provider In India 2024
Source link


